Easy? Not By A Dam Site
Easy? Not By A Dam Site
This is where this campaign quits screwing around and gets serious. The first mission is a walkover, the second is egregiously silly, but the third is a real killer - in every sense.
At Easy level it's not too bad. Even at Hard it isn't terribly difficult - it's not the hardest mission in the game, or even in this campaign - but it does get very intense. Especially at first. In fact it's the first minutes that are the hardest. If you and your men can survive for a fairly short time, it gets a lot easier.
MISSION: To destroy a lock and thereby close the river to shipping. In order to destroy the lock you have to capture a disabled tank on the bridge by the dam and use its gun. Then, of course, get everyone to the escape point.
On this mission it is not necessary to kill all the Germans in the area. Just those in a position to prevent you from doing the job. In practice you'll probably wind up killing them all anyway, but there's no requirement.
CONDITIONS: Daytime. Sunny and clear. Not to be confused with Sonny and Cher.
THE OPPOSITION: Twenty-some-odd guards scattered about the premises. Mostly armed with MP-40s, with a few riflemen. No guard towers (unless you count a couple of losers up on the water tower), no sandbagged emplacements, no fixed machine guns.
In addition there are some others whom we will talk about in the walkthrough.
PERSONNEL: Big choice time. It is possible to lone-wolf this one. I have done it. At Hard level. I did it as an experiment; and really, it's just a stunt. H&D isn't a realistic game by any means, but the idea of one man taking on so many is just too silly to take seriously. True, it's not really more unrealistic than four of them doing it, but still....
After trying it various ways, I finally came down for taking a couple of men along; three men are enough to do the job and a fourth one adds extra trouble at certain points for no real advantage. You can make your own call.
You won't need specialist snipers or fast-gun artists, but they do need to be good solid dependable men with decent shooting skills and they should be able to take a few nicks without expiring in despair. Rankings is a good steady man, as is Aldridge. Gilbert Caven is another.
EQUIPMENT: Your character should have a Mauser - you really need that extra range, this one involves a lot of long-distance sniping - and lots of ammo; a hundred rounds is by no means too much, I'd recommend a hundred and forty or fifty. You're going to be doing a great deal of very difficult shooting, the kind that requires a lot of shots to make a kill. Now is when you'll be glad you took the time to scavenge up all those rifles and ammo in the first campaign - or regret it if you didn't.
You should also carry a Sten or an MP-40 with a modest amount of ammo - you won't be using it much. Take a few grenades too; there are only a couple of spots where you need them but they're invaluable when you do. Just Mills bombs, there'll be plenty of potato mashers lying around.
One of your men should carry a Bren with several clips. I always let Ranking handle the Bren; he's really good with it and absolutely steady. He shouldn't need any other weapons.
The third man (and the fourth, if you take that many) will be OK with the Sten or the MP-40. I recommend taking a second rifle along if you've got one.
If you've got any explosive charges left, bring them along. This isn't necessary, just something you can have fun with.
Finally, and this is very important, each man - including your own character - should have a knife. There's a special and very weird reason for this, as you'll see.
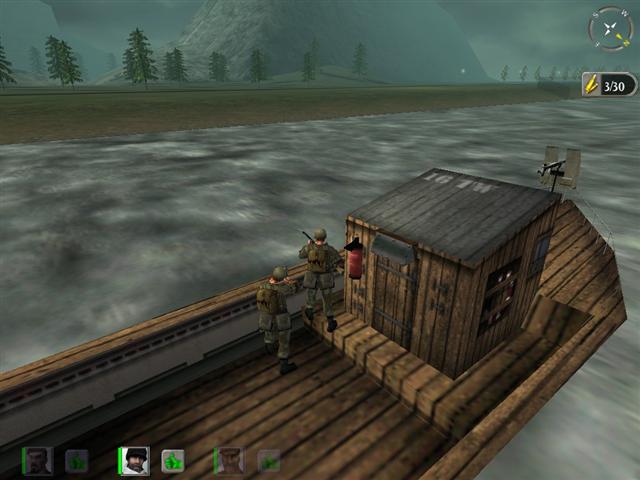
AT THE START: Picture yourself in a boat on a river...yes. You start the mission in that same damn boat you hotwired on the last one. So logically you should have the same men, but you can rationalize around it; you left some of them waiting in the woods downstream or something, and you stopped to pick them up and made some team changes.
Anyway you're in this boat out in the middle of the river, headed toward the dam. You're standing there like an idiot waiting to take the wheel. The boat isn't moving. You can see the lock ahead but the bad guys are out of range.
PROCEDURE: First off you have to understand that the briefing for this mission is even more outrageously misleading than usual. If you try to proceed according to the briefing, you will all be killed before you even get ashore. The part about using the tank gun to destroy the lock is correct; so is the location of the escape point. Everything else, and I mean everything else - including those armored vehicles in pursuit - is bullshit.
The boat won't move until you start the engine, so you can take your time positioning your men. Move your own character, or whoever's going to be the Designated Driver, into the wheelhouse, using the Use key, but don't start the engine yet.
Select the two men in the stern and, one by one, hit the Use key to free them - until you do they can't move from where they are. Move them over to the port (left) side of the boat, next to the wheelhouse. It would be better to have them on the foredeck, but getting them there is very difficult and they tend to fall overboard. By the port rail is good enough.
Start the engine and head for the left bank. Steer about a 45-degree angle; you don't want to hit the bank too square-on or it'll be harder to disembark. Don't go any farther downstream than you can help, though. You don't want to get any closer to the lock compound, because this boat, as you might recall from the last mission, explodes and burns if it gets hit even by small-arms fire. (The Germans must have gotten it from their Japanese allies.)
As you come in toward the bank, though, swing the bow a bit to the right and try to hit the shoreline at as shallow an angle as possible. This is worth a little extra effort and attention; the boat should hit the bank at an angle of considerably less than 45 degrees if you can do it. You'll see why later on.
Also, and this is easier said than done, try not to ram the boat ashore too hard. You're going to be using the boat again later on, and if you run it too hard aground you won't be able to get it off when you need it.
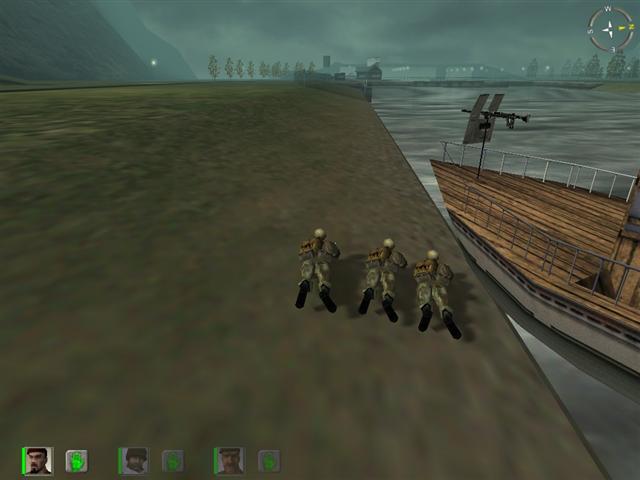
OK, now it's time to get everybody ashore. This part gets complicated, but you've got to do it fast. You can't get them ashore using the map - the boat confuses them - but you don't have time to manipulate them one by one either.
If you're driving, then leave your character in the wheelhouse. (Otherwise he's liable to whip out his rifle and start shooting while everybody else is disembarking, which doesn't hurt anything but wastes ammo.) Take control of a man - any man, doesn't matter - and get him ashore. This may require the jump command; they really aren't any good at this. Remember, too, that they can't swim and they can drown in a few feet of water.
Once the first man's feet hit the ground, pull up the map. Give him a map command to move just a little way up toward the bow of the boat, and lie down next to the water's edge. He shouldn't move far, just enough so the next man doesn't land on him. With the Use Selection command, have him take out his knife. Never mind why, I'll explain it all in a minute. Give him a Wait command too.
Now go to the next man and repeat the process, getting him ashore while the first man is getting into position and using the map to have him do likewise. He doesn't really need to move at all, just have him lie down right where he is, unless you're using a four-man team in which case he should move forward just a little bit so he's out of the way.
Once your men are all ashore you can hit Use to get out of the wheelhouse and jump over the side to join them. Lie down, get out the knife, and give yourself a Wait command.
Moving quickly now, go from one man to the next, taking control and temporarily deleting the Wait commands in order to move them, until you get them arranged side by side next to the boat, well below the edge of the river bank, all of them holding knives and under Wait commands.
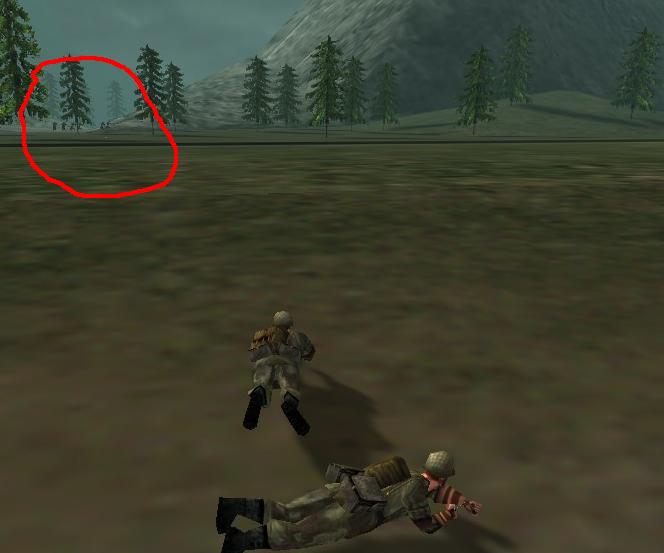
This is what all this bizarre stuff is about: in a short time, quite soon after the mission starts, a big bunch of enemy troops are going to come running out of the hills off to the south. You can see this kind of a gap or break in the line of precipitous rock cliffs, off at the southeast corner of the map.
There are going to be about eight of them, and they're going to come out through that gap and turn left and run westward along next to the base of the cliff, and then they're going to hang a right and enter the compound around the lock and add themselves to the ranks of the defenders. Some of them may run across the bridge. They're all carrying MP-40s and they're good with them.
At the same time, a second group just like them will appear on the north bank, running down the road or alongside it, in the direction of the bridge. They'll join the guards on that side, up by the northern end of the bridge.
That is what these two groups will do if left to their own devices. If you try to stop them, or attract their attention in any way, you will be in for one hell of a fire fight. You can take them out, with luck and proper tactics, but you stand a better than even chance of losing at least one man, quite possibly two, and you could even get wiped out completely.
Now you can see that you're not in a great tactical position, down there on the riverbank. You've got no cover at all, except the boat - which is no cover, just a bomb waiting to go off - and they've got a clear shot at you, and can catch you in a murderous crossfire. Even at Easy level you'd have a hard time dealing with a situation like that; at the harder levels it's suicide.
So my strong recommendation is: leave them alone. As long as they don't see you and nobody shoots at them, they'll run on by - and later on you'll have to eliminate them, but you'll be doing so under much more favorable conditions.
Which is why I told you to have your men lie down on the bank and have them hold their knives. If you let them hold their guns, at least one damn fool will open fire, and then the shit will hit the fan. With the knives, they can't fire even if they see the enemy; they'll just thrash around making weird gestures with their knives. The Wait command is additional insurance, to keep them from sticking their heads up and being spotted by the ones coming out of the hills.
Remember, they won't attack you if they don't see you. The river bank hides you from the ones coming out of the mountains, while the boat hides you from the ones across the river.
Once everybody's in position, you can take control of your character again and use third-person view to check what's happening up beyond the lip of the bank. You may see the pursuers running along by the cliffs or toward the compound. If you don't see them, watch that gap in the mountains. Be patient. Sometimes it takes longer for them to show up. Just be still and wait. If you wait a long time and still don't see running figures up by the cliff, it's possible they already went by while you were jacking around moving your men into position. But be very cautious about coming to this conclusion. If you guess wrong you're doomed.
Wait just a little longer before moving, because sometimes the ones across the river take longer to get where they're going. You might see them too, but don't shoot at them; they will return fire and there you are, exposed and right next to the Amazing Floating Bomb.
You don't like it? You'd rather fight them, even if it means taking casualties? All right, cowboy, then in that case you have to pick which group to fight. (As I say, you're really an idiot if you try to fight them both; either group by itself already has you hopelessly outnumbered.) The ones across the river are really bad news, because you don't have any cover down there by the shoreline. If you really want to fight it out, try the goons coming out of the pass.
To do that you need to get away from the river, out of range of the ones on the north side. Up at the base of the cliffs to the south, there's a kind of hump or rise of ground and you can have everyone take cover behind it and open fire as the bad guys come running out through that gap.
The trouble with this is that you're right in their pathway; they're coming straight at you, it's a head-on confrontation. And they've got you heavily outnumbered. At Easy level you can probably get away with it; at Medium you'll probably stop them but lose a man or two. At Hard you may be wiped out completely.
So this isn't as good a spot as it looks. But make a note of it all the same, because it has other uses.
Now there is a way you can take them out with virtually no risk to yourselves. If you move everybody quickly up to the east side of that gap - the far southeast corner of the map, where you hit the usual invisible wall - and arrange them to fire along parallel to the cliff base, you can take the bad guys in their right flank and wipe them out before they know what's happening. Then you'll have reduced the opposition significantly right at the start.
The only problem with this is that it's weird. They don't actually come running out of the rocks, as they appear to do from farther off; they just materialize, like the guys on Star Trek beaming down. They're not there and then they are. In fact you'll probably be so startled that your AIs will finish them off before you can get unstuck and open fire.
Now maybe this doesn't bother you, in which case you should by all means use this tactic; it's a lot simpler and quicker than screwing around down by the river, and much surer. But personally I just can't handle it. I tried it a few times and it was too weird for me, even by the standards of HDD.
But other than that, if you tangle head-on with these sons of bitches you're asking for it. Me, I just stay quiet and let them run on. It's not that big a deal taking them out later on.
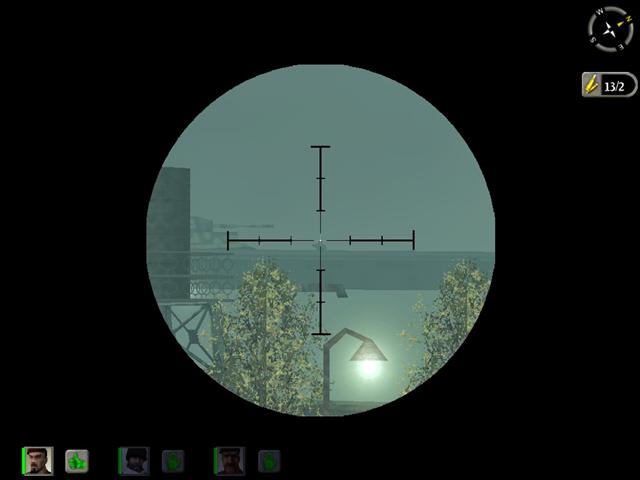
When you're confident they're gone, you can begin your attack. Get out the rifle and crawl forward along the bank a little way, past the boat - not too far, don't get too close to the compound. The key to this mission is that you've got a scoped rifle while almost all the bad guys have MP-40s; you've got such a range advantage that you can pick them off without getting close enough for effective return fire. Don't throw that away.
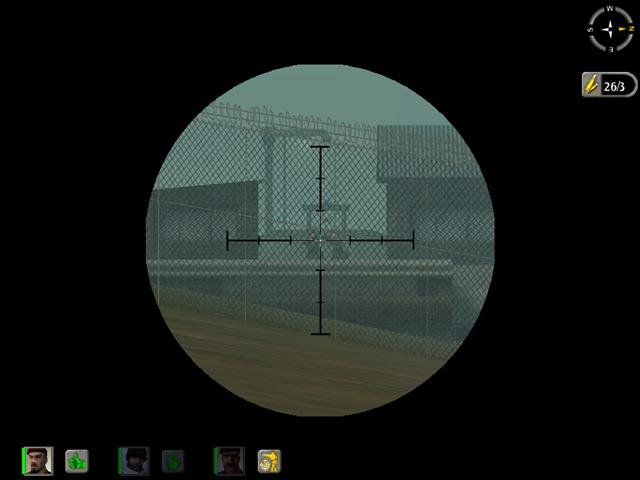
Lying down flat and using the rifle, start picking off the immediate threats. There's one man walking a patrol along the edge of the lock; he'll probably be the first one you see. He's a moving target so you'll probably take several shots to bring him down. There'll be two more coming around the end of the big brown building. You'll have to shoot them through the chain-link fence and sometimes this takes a good many shots too. Already you're seeing why you brought so much ammo. There's one more man in there somewhere. Just take your time and eliminate the immediate threats. There won't be many of them.
While you're down there you may as well take out that asshole on the water tower. He's one of the few enemy with a rifle so he needs to be eliminated. He's not easy to line up on but just keep shooting and you'll get him. When you do he'll jerk upright before falling over, so you'll know he's dead. There's another one up there but you can't get him from here.
(If you did go up and ambush the pursuers by the cliff, send somebody with a rifle back down to the bank and do this bit of sniping before moving on to the next step.)
Once you're sure the coast is clear, get up and run southward across the open area, to that little hump of ground at the base of the cliff. This is an excellent position from which to do most of your sniping. You can lie down or stand or whatever you prefer.

You can bring the others along or leave them where they are. My advice is leave them in place for right now; they're a distraction and you're going to need to concentrate. Besides, until you've cleared the target zone a bit they'll tend to shoot at impossible targets and use up all their ammo.
Now it's time to settle down for some serious sniping. You're in a great position here; you've got lots and lots of people you can shoot at without any serious risk of their shooting you. Say hallelujah.
You might as well start by clearing the bridge. This takes some time and a lot of ammo but it's kind of fun. Those silly assholes up on the bridge are hard to hit but they don't shoot back and they keep on popping up until eventually you hit them. Pick them off in any order or none, it doesn't matter. Try to remember to reload after the fourth shot in each clip; you don't want to shoot your rifle dry, because as soon as you do it goes automatically to reload and you lose your sight picture. Which means you may not see whether you killed him or not.
They'll duck down and then pop back up, but if you do get one you'll know it; he'll jerk and buck and you may even see the Peckinpah blood splatter. Eventually the time will come when there are no more heads sticking up above the bridge parapet.
Now you've got some Axis-type persons to terminate down in the compound. You might want to start with the two by the end of the bridge; they're out in the open and easy targets. There's another pair in the area between the bridge and the water tower, near the fence; usually one of them is hard to spot because a tree blocks your view, but stay on him till you get him. These guards have to be eliminated before you can move about freely. If you didn't get the one on the water tower when you were down by the bank, get him now.
When they're out of the way, you can stand up and move forward a little way, to the other side of the hump. The next bit is tricky - not dangerous, just tricky. First scan the bridge again to make sure no new snipers have moved up from the other side. (They'll do that; at least one almost certainly.) Now use your scope at max zoom and study the area to the left of the control tower, or whatever they call it, and the big brown building. You should see a parked Kubelwagen. Somewhere in that area - usually to the right of the Kubelwagen - there will be a couple of soldiers. They have to be eliminated before you can do much else, because they've got the approaches covered.
Unfortunately they're very hard to see because of the trees and fences and other stuff. You may have to move around a bit to locate them. Take as long as needed, because you have got to take them out. Move around in the open area if necessary, but don't get within their range - stay back by the cliff.
Once you're certain you've killed them, check the bridge again. If you can't see it all from where you are - the far end may be blocked from your view - move to where you can. There's a good chance there'll be a new sniper over toward the far end of the bridge. They tend to run up there, especially after you start killing the guards on this side. This is a constant hazard so you have to keep checking.
This is a good time to bring up one or two of your men. Leave the Bren gunner with the boat - you might, just for style, give him back his Bren and let him lie down on top of the bank facing toward the compound, as if guarding the boat - but if you've got a second rifleman, bring him up to join you.
Now you can move on westward, just a short way, along next to the base of the cliff. Look on up the road, to the west. As you move forward you will see a couple of troopers standing there beside the road. Take them down; you've got the range on them so it's a simple and pretty much risk-free job.
Bring your other rifleman up to join you and move on a little farther - not too far, there's still somebody you haven't eliminated and he'll get you if you go near the end of the bridge - while your man covers the bridge. The two of you can leapfrog each other in this way, so that the bridge is always covered by one man. You've got two jobs to do: pick that last sniper off the bridge, and shoot the other asshole off the water tower.
The one on the tower is hard to see clearly; his deceased partner tends to block your view and your line of fire. The danger is that while you're trying to get a clear shot at him the one on the bridge might get you. In theory your partner should be covering the bridge, but unfortunately the AIs aren't that reliable.
(In fact you may find yourself with a peculiar and irritating problem: one of your men, whichever one you're not controlling, may start firing steadily and pointlessly at the man on the water tower. If he does you won't be able to stop him except by physically moving him out of the area. "Cease fire" won't have any effect, nor will a Wait map command. If you don't stop him quickly he'll fire up all his ammunition at that enfant perdu on the water tower. I've seen it happen.)
The one on the bridge gets priority, because he'll shoot at you if he gets a chance whereas the one in the tower is pretty clueless. But with careful stalking and good marksmanship you'll eventually eliminate both of them.
There should at this point be only one enemy left alive in the compound. He's in a bad spot, though, very well concealed and in a perfect position to cover the approach to the bridge, and there's no way to snipe him at long distance. Getting him requires entering the compound.
But this isn't a straightforward proposition. There are some guards left across the river, over by the far end of the bridge, and they've got most of that compound and its approaches covered. And while it's possible to pick them off with patience and luck, it's very difficult because there's a lot of chain-link between them and you - though they don't have any trouble shooting through it.
So you can't just go scampering over toward the gate. Now it's possible to work your way around in a semicircle to the east and come at the compound gate at an angle, so that the big brown building blocks you from the gunners across the river. It's possible to run the rest of the mission, in fact, with them still there and alive; there's no mission requirement to kill them and if you watch where you go and maintain cover, you can stay out of their line of fire.
And if you're lone-wolfing this mission, that's what you'll have to do. Or if you've taken casualties, you've got wounded, whatever. What I'm about to recommend is strictly for a functioning team of at least three good men.
If that describes your lot, then move everybody back by that hump of ground, and then head down to the river, to where you left the boat. The boat? Yes. You're going for another boat ride.
At this point you probably ought to save the game. Getting everybody back aboard the boat is really hard, and there's a chance you might lose a man or two; they fall overboard and drown quite readily.
Now you'll see another reason I advised running the boat aground at a shallow angle; it makes it easier to board from the bank. It's still a graceless and irritating business, though; you have to use the jump key - and then get off it quickly, or they'll jump right on off into the river - and even after you get them on the foredeck, it's tricky as hell moving them back to the stern. Which you need to do, because the boat doesn't want to move with their weight up front.
OK, you finally got everybody on board. Move yourself, or whoever's driving, into the wheelhouse. Get the others lined up at the starboard (right) side next to the wheelhouse, ready to jump ashore. The Bren gunner should be in position to go first.
Hit your backup key and the engine will start in reverse. Get the boat backed clear of the bank and turn her around and head back upstream and then swing in a big half-circle to the other side and run her aground just as you did before, with the bow pointing downstream. Be sure and land upstream from the end of the fence.
(If the boat won't move after repeated attempts, you ran it too hard aground at the start. Give up and disembark again. The job is still doable; you'll just have to watch out for those bastards across the river and not give them a clear shot at you.)
Once again you need to move quickly. Get your Bren gunner ashore and pull up the map, and give him a command to move to the center of the paved road and lie down with his Bren, facing in the direction of the bridge. Give him a Guard command, right down the middle of the road.

Now everybody else gets out and likewise runs over and lies down, facing in the same direction. Your second rifleman should have his rifle out, as should you. Lie still and study the scene carefully through your rifle scope.
If you see anybody, start shooting. Chances are you'll see a couple of guards standing somewhere near the bridge abutment. If you don't, then move forward just a very short way and try again. It shouldn't take long; they're right out in the open. Try moving to one side if you think a tree might be blocking your view.
When you shoot them - possibly even before - the shit will hit the fan. That gang on the north side of the river are far more aggressive than the cattle-to-slaughter fools you've been potting on the other bank. They'll come at you. Lie still after you shoot those first two guards, and be ready for an attack.
If it doesn't materialize after a reasonable wait, you may not yet have triggered it. Move a little closer, keeping on the alert, and don't get too far ahead of your covering fire.
It shouldn't take long. They'll come charging hell-for-leather up that road and through the trees, straight toward you - and, if you've got a good team, they'll get chopped down before they get anywhere near you. The Bren gunner is your main asset, of course, but you can get in on the act too; normally a scoped rifle isn't much good on moving targets, but they're coming straight toward you so you can hit them pretty well. Your other rifleman will probably score too. It's not likely they'll make it to within Sten or MP-40 range.
When they're all down, you will no doubt feel a certain sense of satisfaction. That's fine, but don't get overconfident. Almost certainly there are others still down there by the bridge. Move closer, in the same way you've been moving - riflemen forward for a short distance, lie down and bring the Bren up, riflemen move again and so on. Every time you stop, scrutinize the area around the end of the bridge through your scope. Chances are you'll see at least one head sticking up. If so, you know what to do.
When you're close enough to the bridge that you don't need the scope any more, switch to your submachine gun and run forward to the side of the bridge ramp. Don't run around it or try to climb up on the bridge. Use your third-person view and very probably you will find at least one remaining enemy on the other side of the ramp. Lob a grenade or two over the ramp and you should be able to take him out with no risk to yourself.
If you've got a total of six enemy dead accounted for on this side of the river, then you own the north bank. You almost own the whole place, but not quite yet.
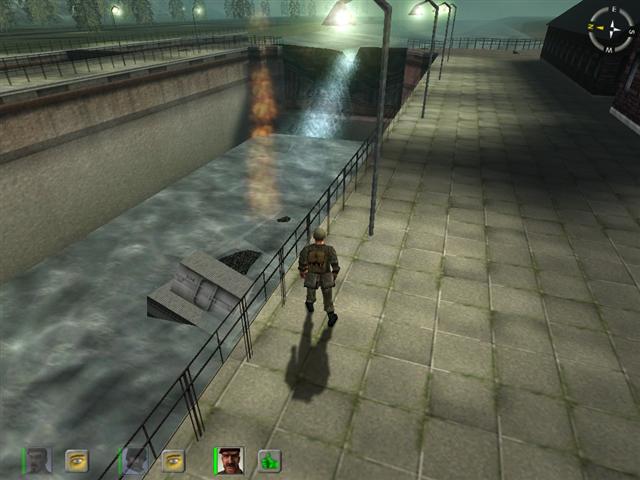
Take a minute to scavenge, if you like - this is just about the only place in this mission you can get Mausers and rifle ammo - and then head back across the river. Not by the bridge, leave the bridge alone for now. You'll have to run down to the end of the fence, where you left the boat - you might like to pause and blow that damn boat up with a burst of fire - and around the end and up along the riverbank, till you reach a place where there's a little catwalk that crosses the lock. Walk across that and hang a left and go down and walk across the top of the dam; you might as well get a good look at your target.
(At this point it may occur to you to set explosive charges and blow the dam in the conventional way. Doesn't work, I'm afraid. I mean, you can set them off, and it'll damage the dam, but you won't get mission credit until you put an 88mm. round from that tank gun into the lock gates. At least it wouldn't for me. Sorry.)
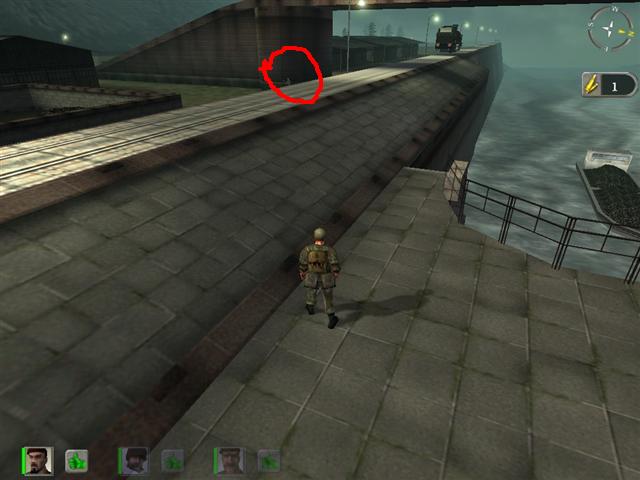
Now there should be only two hostiles left alive on the premises. One of them can be dealt with later. The other needs to be whacked now, because he's in a position to make life dangerous for men moving around in the bridge area. He's down by the head of the bridge on the south bank, on the east side of the abutment, and he's got an MP-40 and an attitude.
So when you come across the dam, keep going, past that big brown building and then over to the east side of the little brown gatehouse. Have your submachine gun out. Take a moment to understand where he is in relation to the surrounding structures. Use third-person view and look in the direction of the bridge. See that long concrete berm with the railroad track on top? He's in between it and the bridge pier. If anybody approaches the bridge he'll cut them down, but he's generally looking in that direction and not prepared for a flank attack.
Stand up, get your buzzgun ready, step sidewise past the corner of the gate house, and crank a full clip of 9mm Parabellum down that way. It doesn't matter too much if you can't see him; once you understand where he is you'll probably hit him. Jump back under cover, reload, and repeat just in case you didn't.
He's hard to see, though, so you better check. Go around the gatehouse on the north side and run over to that long concrete berm, using it for concealment. Use third-person view and see if you can spot him. If he's definitely dead, fine. If not, then try again. You might try lobbing a few grenades over the top of the railroad tracks. (Don't try this, though, if there are any guards left alive on the far side of the river.)
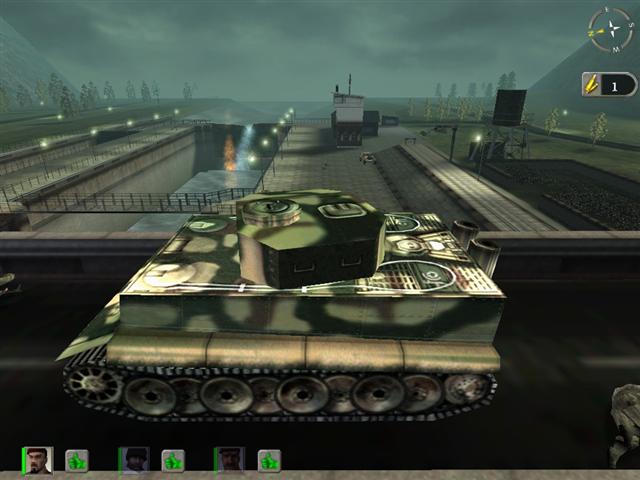
All right, now it's time to go do it to it. Up onto the bridge, using the halftrack for cover (it doesn't run, by the way, don't bother trying) and checking with third-person just to make sure there's nobody waiting for you. Around behind the tank and check again. Now walk up beside the tank, on the left side, to a point roughly even with the center of the turret. Hit the Use key a couple of times and there you are. (If you stood too far forward you'll wind up in the driver's seat rather than the gunner's. Try again.)
The next part needs to be done third-person. This is no loss, because there's no dramatic view from inside the tank, it just looks weird and you can't see where the gun is pointing. Third person, and wide angle at that; and now use your mouse to turn the turret and adjust elevation. Aim lower than you think you need to, the tendency is to shoot high.
When you're pretty sure you've got it aimed at the lock gate, trigger and see what happens. Observe where the shot goes. You'll almost certainly miss, but you should be able to make corrections. You don't have many shells for that thing so you better get it in the next few shots. (Might be a good idea to save at this point.) You have to hit the lock gates twice, once on each side, before it will register as completed.
Once you have destroyed the lock and gotten the completion message, if you have any rounds left you can play with the cannon a little. You can sink that barge in the lock if you depress the gun far enough. You can also try to blow up that halftrack over by the control tower.
When you're out of shells, exit the tank and walk or run back down the bridge. This is a good place to reassemble your team; the others can just run across the bridge.
Now you've got one last son of a bitch to take care of. He's down at the far end of the westernmost building, past that truck with the flat-bed trailer; he's standing next to some crates. You can't see him from here. He's in a perfect position to ambush you as you march on down the road, thinking you've finished the mission.
You've got two basic ways you can get him. You can go over by the cliffs and lie down and move sidewise till you can see him and pick him off with the rifle. This is by far the safest and surest way; you'll have to move gradually and keep checking until you see part of him sticking out.
Or you can go around the buildings, on the north side - between the buildings and the railroad tracks - and come around the corner with the MP-40 and shred him. If you choose the latter way, don't assume he'll have his back to you; he turns around a lot. You can always use the third-person around-the-corner trick to see when he's looking the other way, but this is not 100% safe. It's also possible to grenade him, but it's not easy and he doesn't like it and if you miss he's liable to come out and shoot you. All in all, even though you may be tired of sniping by now, it's the best answer in this case.
Now you and the boys can scavenge a bit if you like. You can also use your explosive charges, if you brought any, to blow things up. That locomotive on the tracks is a very rewarding target, as is the tank on the bridge.
You can also go down and take a closer look at your work, if you like.
Just one more thing: if your Bren gunner gets killed, you have got to get the Bren and take it with you, no matter what else you have to dump. You're going to need it very badly in the last mission of this campaign.
Nothing left now but to head on down the road to the escape point. The Kubelwagen runs, if you can get at it safely - don't even think about it if you didn't clear out the other side of the river - and if it didn't get blown up in the fighting; and it's fun to maneuver it out of the compound and load everybody up, but really the distance is so short it's no big deal to walk.
Go somewhere and have a good meal and a night's sleep, because the next one isn't going to be nearly as much fun.